Friday, February 27, 2009

Anyone else have an Acorn Rando Bag review?

I know I'm not the only here that ordered the new Acorn Boxy Rando bag. If you have any reviews of it or photos of it on your ride, send them in.

Email me!

Sweet Creme Tires in 700x35 (UPDATE)

Wallingford Bicycles has some new Schwable DELTA CRUISER tires in Creme. Not a whole lot of details other than "no reflective stripe. Basic puncture protection" and that they are 700x35. I've been looking for creme colored tires (in 700) for a while, but couldn't find any other than the ones that came included on the Amsterdam bike. However, those were huge width-wise!


(NOTE: The ones in this picture have a reflective sidewall and are NOT the ones from Wallingford, but I was trying to find a better pic of the tires, so here ya go.)

700x35 seems a lot more reasonable. I'm not quite sure about the ride characteristics but at only $22/tire (compared to the Fat Franks at $39/tire) they're not as cost prohibitive.

UPDATE:
Bill from Wallingford left a comment and gave a little more detail about the tires. Thanks Bill!


Delta Cruiser, 700x35, 35-65psi, 650g.

Thanks for the mention, Russ.

People were asking for the creme Fat Frank without the reflective stripe. That tire doesn't exist but I found this one in the back of the catalog under "Basic Line." Where the higher end tires have a lot of ® names for their protective belt this tire has "puncture protection."

Each size of the Delta cruiser comes in a mix of colors but the 700x35 and the 28x1/12 are the only ones in creme/no reflective stripe. Other colors are gumwall, black, black-reflex, whitewall, and the mysterious lever-reflex.

I'm not sure how this tire rides. I don't have a bike that will fit it. On one hand it is a basic Schwalbe, on the other hand it is still a Schwalbe. It sure looks good.

Bill

Tuesday, February 24, 2009

Acorn Bag Review (and comparison to the Ostrich)

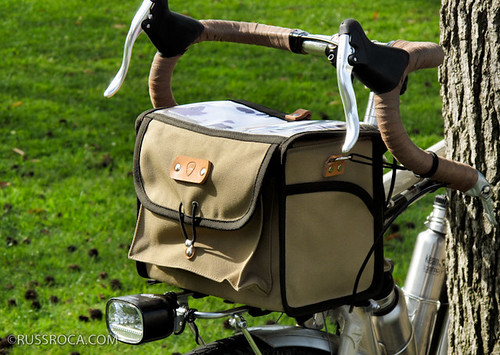
I've had my Acorn Boxy Rando Bag for a few days and I've taken it on a few rides with different kinds of loads. I haven't taken it touring yet, but I think I have a good sense of how it will perform.


Initial Impressions
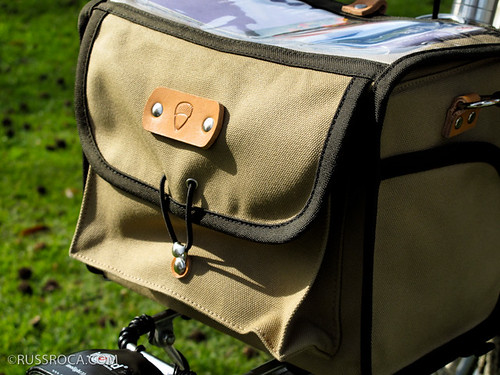
Opening the box was followed by "oooh's" and "ahhh's". The bag really exudes high craftsmanship. The tan colored bag with the dark brown trim and light leather accents, I think, is a rather handsome color combination (and seems to be custom made for my Surly :). The canvas is thick and stiff and holds its shape rather well. The metal turnbuckle clasps have a nice positive feel to them and closes more precisely than elastic cords.


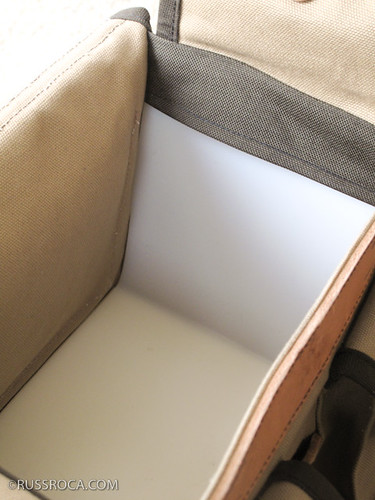
Overall, the bag holds its shape rather well. There is a solid formed stiffener (with radius edges so it won't abrade the bag) that runs from the side-bottom-side of the bag. This keeps the bag standing tall and also allows it function well without the use of a decaleur by minimizing lateral movement.


Decaleur or No Decaleur?
When Acorn first announced they were going to make a boxy rando bag, they mentioned they were putting great effort into designing it so it wouldn't necessarily need a decaleur. Why is this important? Well, for one, decaleurs and all the hardware is expensive (per VO prices, decaleur's run $59 and bag mounts $19, not counting the front rack!). When you buy these kinds of bags it's not just the bag you're buying, but a lot of hardware that can add up!

Did they succeed in creating a decaleurless design? Yes.

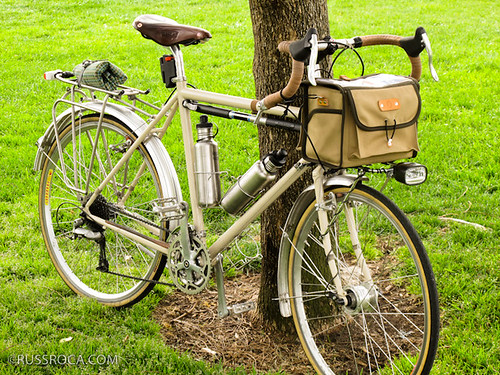
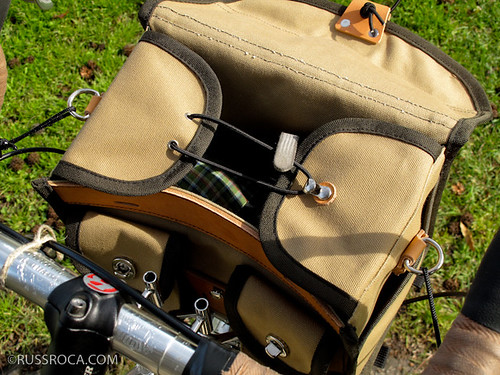
With a combination of several mounting points and an excellent stiffener, they've been able to make a bag that only needs a front rack. First of all, on the bottom are 4 velcro fasteners that wrap around your front rack's tubing, preventing any side to side movement. This is more effective than having a strap that wraps around the whole rack, since it would have a tendency to rotate around the rack. With 4 opposing connection points, the bag isn't going anywhere.


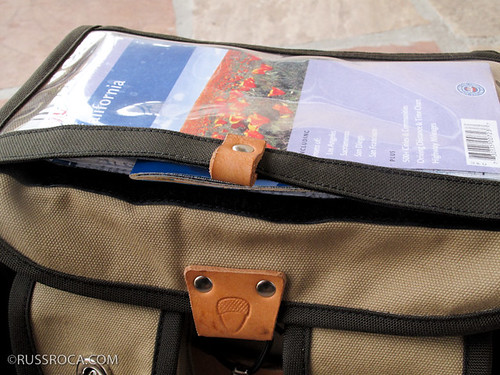
Secondly, there is a large leather pocket that slips over the back of your front rack. It is stouter than a single leather strap and holds the bag more securely in place (see the second photo on this post..that leather patch with slits, slides over the back of your front rack).

Thirdly, there are the two cords that wrap around your handlebars from either side. This further prevents any side to side motion. The end result is a bag that is well secured and won't budge despite having a lot of weight in it. I have stuffed this bag full with a journal, my camera, 6 foot OnGuard cable, large Kyrptonite U-Lock and a sweater and the bag remained perfectly still.

The downside, of course, is that there's a bit more too it when you put on and remove the bag. It's not quite "slide it on" and "slide it off" easy, but it's not brain surgery either. You're talking another extra 20 to 30 seconds if you're slow.

Some Niceties
There are lots of great little details that make this bag a superb piece of bike luggage. First, there are the turnbuckle clasps on the rider side of the bag. They're easy to turn, easy to open and easy to close...even with gloves on. It is much less finicky than elastic cords.

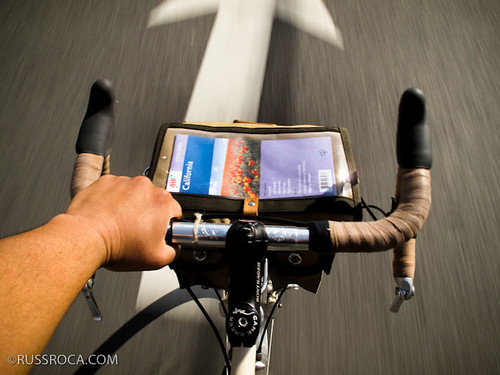
Another great touch is the map holder. It is sealed on 3 sides. On the side it does open, it has really aggressive velcro. Nothing is escaping the map holder. This is a bit of a weakness on the Ostrich bag. The map holder is open on the sides, which means every time I lay the bike down to take photos, my maps would work their way out.


Capacity
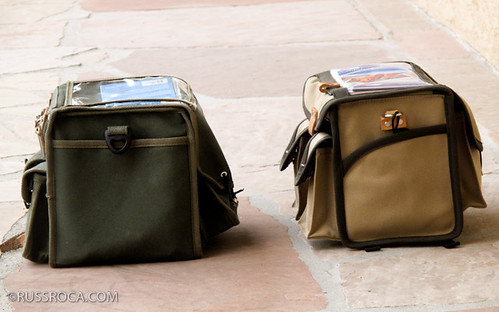
My only other rando style bag is the Ostrich bag from Velo-Orange so I'll compare the two here. As you can see from the photos, the VO bag is slightly bigger. They are both roughly the same width and height, but the Ostrich bag is about 2 inches deeper. In practice, this is actually quite a noticeable difference.


When I'm using my Ostrich bag, I usually keep my BikeBurrito in there with plenty of room to spare. With the Acorn Bag, I have to economize a little more and I'll put my BikeBurrito somewhere else to make room for my camera, gloves, arm warmers, etc.,

If you absolutely need the room, then the Ostrich bag is the clear choice. If you can economize your space a bit, then the Acorn bag is no big sacrifice in terms of capacity.

Conclusion
PROS
-Awesome craftsmanship. Well made. Durable materials.
-Super secure even without a decaleur (saves you $80 in additional hardware...not including front rack)
-Great stiffener that helps hold up the shape of the bag.
-Very usable and functional turnbuckle clasps that can be operated even with gloved hands.
-Excellent map holder that keeps the maps INSIDE!
-Buckles to use with a shoulder strap for off the bike use.
-You can open the bag while you're riding :)

CONS
-Slightly smaller capacity than other bags out there (Ostrich, Jitensha)
-Availability. Acorn is a small cottage industry and their output is limited. However, if you can get one of their bags, it is well worth the price and wait.

Overall: Highly Recommend++

Sunday, February 22, 2009

Planet Bike Dynamo Light - Part 1

With the maturation of LEDs and bike technology, there has been a recent slew of dynamo powered lights. Many of them, however, like the Edelux and E3 can be a bit spendy. That's why it's nice that Planet Bike has created a dynamo version of their Blaze 1W in the form of the Blaze Dynamo.

The Blaze Dynamo has a similar form factor as its battery powered cousin, but comes in a nicer dark grey shell (in my opinion). When you purchase it, it comes with the light and its power cord that has the ends stripped, ready to be plugged in. NOTE to buyers, it does not come with the plastic connector caps for your dynamo, so make sure you have one that matches your hub.


The first thing you have to figure out is where you want to mount the light. I first tried the handlebars, but the power cord was TOO SHORT to mount to the handlebars and hub while having sufficient slack for turning. This light is either going on your fork or hub via a nub of some sort (Minoura Besso Light Holder, VO Lowdown Light Mount, Gino Light Mount), or on your rack.


I went the rack route. I took parts of a Minoura Top Swing that I had, a little metal piece for a reflector (I think) and cobbled something together to the front of my Rivendell Mark's Rack. Worked pretty well and lets me put two lights side by side for comparison. (VO also shows some alternative rack mounting methods here.)


For those that have never used a dynamo light, this is what the connector end of the wires look like. They're stripped and are sometimes color coded. You have to slip them into a connector cap that is specific to the dynamo hub you're using before you can plug it in. Takes about five minutes. No biggie, but can be confusing if you've never done it before.


This is how the light sits on the mount after it's plugged in. I'll write more about the performance after a few night rides.


Saturday, February 21, 2009

Thoughts on new roads, climbing and my Acorn Bag


After reading an article from UrbanVelo about Danny Chew, the Million Mile Man, an accomplished long distance rider (he crossed the country in 8 days, 14 hours!), whose mantra is "new roads!," I decided to find some new roads of my own. Well, not particularly new, but one that I have never ridden.


Long Beach is flat and the only significant hills are either 15 ugly industrial miles to the North (Palos Verdes) or 20 suburban/McMansion miles to the south (Newport Beach). OR, there is the independent municipality of Signal Hill, which as the name suggests, resides on a hill. And what a hill! From the top, you have clear views of downtown Long Beach and on a clear day you can even see downtown Los Angeles pretty well.

I've never ridden up the hill before on a bicycle, primarily because I've had an aversion to hills. However, with the recent tours I've been doing, I've come to appreciate a nice climb. That's not to say I'm fast or particularly graceful at climbing, but I appreciate the Zen/Pure Being/Existential state that one arrives to when slogging up a hill. Also, I wanted to take some more pics of my Acorn bag :)


So empowered with Danny Cheew's mantra, my new found joy of climbing and my desire to photograph my Acorn bag, I had all the needed momentum to power up the hill. For locals, I took Temple to the base of Signal Hill and went up Stanley to Hill Street to the park. Now, I'm still sort of sick, so by the time I got to the top I was breathing pretty hard and hocked up a good fistful of phlegm.

The view, for Long Beach, was grand (though a bit smoggy). I took a few pics and rode down Skyline to Cherry and ascended again. The second ascent wasn't as bad since my legs were warmed up. All in all, it was a pretty good morning. I had conquered Signal Hill, I rode some new roads and I coughed up a bunch of phlegm (oh and I took some pics).

Apologies for the rambling narrative.

Friday, February 20, 2009

Acorn "Boxy Rando Bag"


I just received the Acorn Boxy Rando Bag this morning and it sure is pretty. I know a lot of you have been anxiously waiting to see more pics and get more details about the bag so I took some quick snaps at the park. I'll fill in details about the bag in the coming week, for now, some bike luggage porn.


Thursday, February 19, 2009

Map of our trip to Ojai

I put up the route of our last trip on Bikely, for those that might be interested. It's a great intermediary tour. Relatively lowish miles but some climbing that opens up to some great scenery. Spring and fall are the best times to do this ride, since it's off-season and also because it's not so HOT! I did part of this ride during the summer and it's a scorcher, not to mention the campsites are full.


The Tour of the Tour of California Tour

Rapha and the MASH folks are all riding the Tour of California route this year. Not to be left out, I'm beginning to think I should assemble a band of bike tourists (the pannier toting kind) to tour the Tour of California route.

I've even got a great name all worked out...The Tour of the Tour of California Tour or TTTCT....3TCT.

Who's in?

:)

Wednesday, February 18, 2009

A good site : Post-Car Adventuring

I know most of my rides are Central and Southern California-centric, but hey, it's where I live :) Unfortunately, I can't quite traipse around this big blue planet just yet and find all the wonderful S240 or short-tour possibilities (trust me, I would if I could).

So I'd like to point people to a site that documents many car-free adventures (using a combo of transit and bikes) in Northern California.

Check out BikeandHike for a collection of some of their favorite rides. Heck, they even have a book/zine out to purchase.

We even have a little bit of a back story. Laura and I met Kelly and Justin while we were on tour last summer. They were biking down the coast and we had just finished our Not What I Signed Up For Tour. I think we ran into each other in front of a coffee shop on State street near the ocean.

I noticed instantly that Justin had a white powdercoated CETMA rack. I happened to be using my CETMA rack on that trip as well. So, of course, we geeked out a bit and we compared mounting methods (Justin had affixed his to his QR, I believe and I had hacked together a way to mount it to the front eyelets using a stack of spacers).

We were all trying to board the same train. There was a tense moment of wondering if we were all going to get on (Amtrak has only space for 6 bikes on a train that goes all the way from SLO to SD...ridiculous!). But, we all got on and met for a few beers in the cafe car. We shot the breeze about our trips and we talked a bit about touring and Rivendell.

It was a good time and we've kept in contact periodically. It's nice to see that they're still touring and they're doing well. So if you live in the Bay Area or are looking for some good trips around there, check out their site and tell them Russ sent you!

On Whisky

I got some great responses regarding my interest in a little more compact beverage for the road. Proving that many of my readers either have wide tastes or a penchant for alcohol :) Thought I'd post some of the comments for easier reading (and finding).

A great one from Fin Lumsden that gives a good overview:

Ah, whisky. Now you're talking! (Note lack of 'e' in spelling - whisk'e'y is for Irish or rye, whisky is for Scotch whisky). Glenrothes happens to be one of my favourites - as with The Macallan, it seems to improve massively with age. The Glenrothes (based in the Speyside town of Rothes) release their product with a 'vintage' mark (eg. 1989, 1992 etc) rather than the more usual age statement (12yrs, 18yrs etc). It's a 'big' whisky but not in the slightest bit aggressive. It's spicy, full, rounded with lovely plummy, fruitcake flavours and a lovely creamy velvety mouth-feel. Try the 1989 vintage if you can - all the major characteristics of G'rothes there in full flow, but it shouldn't break the bank. If you're feeling flush (and who is in these straightened times...) go mad and find a 1973 or a 1978.

Another big spicy malt is the Dalmore (dal-MORE). A few years ago they released a 'Cigar Malt', designed to compliment the smoking of good quality cigars (not that I condone smoking...), but what they came up with was, by necessity, a big-hitter of a whisky - caramel, chocolate, pepper, leather, sultanas - it has the lot!! It might be just what you're looking for if you want that malty, full stout flavour.

The Islay (pronounced EYE-la) malts are very much love 'em or hate 'em. These malts from the Scottish island of Islay, include Laphroaig (la-FROY-g), Lagavullin (lagga-VOO-lin), Bowmore (bow-MORE) and the imperious Ardbeg (ard-BEG). All are massively flavourful, but are almost medicinal in their impact. They come under the classification of the "Phenolic malts" - phenolic as in 'phenol' as in 'trichlorophenol' as in, you guessed it, TCP... :) They make great winter-warmers (especially Ardbeg) but are very much an acquired taste. (An exception to the Islay rule is Bruichladdich (brook-LAH-dy) - it has the peatiness, the slightly briney character that comes from maturation halls that sit cheek-by-jowl with the seashore, the things which mark out an Islay malt, but it's as if someone has turned the volume control down slightly. Well worth a look.)

Hope that's been useful to you. I was born and brought up about 150ft from a whisky distillery (Deanston) and can still leave my front door, turn right and see the still room :o) I love the stuff!! :)

From Sweet William. The link he provides has some tasting notes:


Anything from Islay is going to be big and peaty, with Laphroaig being the prototypical beast.

Something like The Macallan is more mainstream and, frankly, less brutal.

Another place to go is brandy - the French stuff is pretty expensive but some other countries have some real bargains - eg Angove's XO 7 (from Australia c. $60US)

With all of the barrel aged spirits, time in the barrel is a strong determinate of quality.

http://www.physics.uq.edu.au/people/nieminen/spirits.html is a good place to wander down the wrong stack
If you want something "dessert" then Oporto, Jerez, Tokay and all the antipodean hybrids using Solero systems are very intresting. If sticky and sweet.

Josh Mitchell has some great stouty/bourbony beer recommendations:


A bottle of either of the following takes literally hours to properly enjoy (so one of enjoying on these is like three I-Stouts):

Harviestoun - Ola Dubh
(12, 16, or 30 year reserves)

Goose Island Bourbon County Stout
(yearly production, released in november-ish)

There are some others of similar vein. However, I can't remember the other ones that don't come in a large bottle (ala, Boulevard's Smokestack Series) at the moment (check the limited edition PDF - bourbon barrel quad was quite good).

Oh, and typically these have a higher alcohol content (for instance the Bourbon County is 13%).

You might check out the Beeradvocate.com review of those as well.

Mephistopheles' Stout is another. Though it's not cask aged like the two above, it's still pretty good.

bmike with his favorites and some tasting notes:


Taliskar - sharp, warm, nice heat in the throat - used to be my favorite
Oban - has a great heat, esp after it goes down, sharp and peppery
Bowmere - smokey, peat flavor - I appreciated it but I thought I was drinking distilled dirt
Glenmorangie and Glenfedich - 2 different brands, slightly different flavor, solid and you can usually find it when out - bonus if you can get the Glenmorangie in the port or sherry finish - not something I'd drink all the time - but lovely
MacAlan 12 or 14 - a good standbye when the 18 is too $$ or not available
MacAlan 18 - my all time favorite, warm, a bit of smoke flavor, smooooooth going down, I drop some $$$ on a bottle and keep it in the house and sip it on special occasions

Gear Notes - Ojai Trip

Seal Skinz socks and Keen Sandals - continually impressed with the combination for wet (and muddy!) weather. Very versatile, allows for easy cleaning of both. No more hassles with wet shoes or wet socks.

Ortlieb Bike Packer Panniers - also continually impressed with the convenience of these panniers. Though not as many compartments (I use separate stuff sacks anyway) as Arkels or others, the waterproofness of the bag is very much appreciated on wet weather trips. It's nice that they're waterproof while you're riding, but even nicer at camp. You don't have to worry as much as leaving them out in the open or on a particularly damp spot.

Swobo Merino Bobby - I decided to try this out as a riding shirt on this trip. I tend to run real hot and am always stripping layers after a few miles. It worked out great. Though probably not intended as a riding jersey there's no reason you can't use it as one. On cold mornings I wore a thin wool base layer below the shirt. I think pairing it with some wool arm warmers would have worked as well and would have been less hassle to remove.

EVT Mirror - I think it's now my favorite mirror. Lots of surface area means that when it rains, you can still get a good image even when rain droplets form.

Velo-Orange Ostrich Handlebar Bag - This bag is still going strong after several trips. The fabric has gotten a little floppy but still works well. I have had to retie the little cords to insure good closure since the bag has begun to slouch a little. The little rain cap works ok but during a real downpour the bag will get a little damp. Nothing serious, but just note that.

Rivendell Wool Cycling Cap and Kachurik head band (ORANGE) - I used them together when it got really cold. I wish they'd come out with a version of the wool cap with ear warmer thingies. However, it is nice to use them independently as well. Like I said, I tend to run hot, so it's nice sometimes to cover the ears but leave the top open.

Tuesday, February 17, 2009

Epicurean Racing

A beautiful video for Rapha. I'm not a big fan of pro-cycling because it seems a little boring and soulless (mostly because of the blah camera angles). However, this vid is beautifully shot and even though it is about roadies, it evokes the same feelings I have about touring.


Rapha Rides The Tour of California from RAPHA on Vimeo.

Request for Article Submissions : Whiskey, Scotch, Bourbon

I'm a beer snob. I think it's a wonderfully complex drink with a real wide palette of flavors. But, it's a bit on the heavy side. As much as I'd like to lug around a big bottle of IPA for lunch and an Imperial Stout for dinner, there are a few other camping necessities that take precedence.

So, I've been looking at more distilled beverages like whiskey, scotch and bourbon as something a bit more compact for a bike tour nightcap. Is anyone here an aficionado? I'd love to have someone write something about their favorite style of spirit, make some suggestions and some analogies (for example, "if you like the smokey flavor and body of an imperial stout, you'd love this...".)

If you're interested, send me an email!

Stuck in the Mud-dle with you!


(photo by Laura Crawford)

Excuse the terrible terrible pun, I couldn't help myself. On this last trip, we lucked out with some great riding weather the first two days. It didn't really rain until the third day, but boy did it come down in buckets (mostly when we were sleeping...and while we were having breakfast so we missed the brunt of it).

On our way out of Ojai I came into close contact with something that I don't see very often as a Southern Californian. Mud. Thick, concrete-like 3-inch thick mud. I'm not quite sure what I was thinking, perhaps that I could just ride through it really fast. It didn't happen. In fact, my bike went from about 13mph to 0 in four feet. When I got off to push the bike, my feet sank deep into it and it actually removed one of my sandals.


Now, this is all preface to tell you how great this Seal Skinz and Keen sandal combination is. I've been riding this combo during the rains here and it works great. Because of the open design of sandal, it dries really quickly. If you're on tour, this means you don't have to wait days for your shoes to dry. The Seal Skinz keep your feet dryish and warm (I wear a pair of wool socks with the SS). I have had the waterproofness compromised a little, but it was still FAR better than any other setup I've tried.


In this particular instance, my Keens were completely caked in hard mud. The next clear puddle we ran across, I simply walked around and stamped in it and was able to get most of it off. The same for the socks, I just waddled around a bit in a few inches deep of water and got the mud off while my inner sock stayed dry.

If I had shoes and regular socks, this would have sucked a lot. I would have had to wash out the shoes and change socks, unless I wanted to rough it until the next available spigot.

So, just saying, Keen sandals + Seal Skinz + wool socks make for happy feet.

Monday, February 16, 2009

Wow!


(photo by Laura Crawford)

Laura and I just got back a few hours ago and are dead tired, but I couldn't help but post some of the pics from our trip. Due to an Amtrak snafu, Laura and I had to do our trip in reverse and go over a little ridge we hadn't planned on. It was a little extra climbing, but WOW, the scenery was great.


Here are some snaps. The riding and the views were amazing. I could hardly believe it was so close to Southern California.


Friday, February 13, 2009

Riv Reader Online

Again....just casually surfing the internets and lo and behold I find myself on the Rivendell site. There's a link on the home page with the latest Rivendell Reader as a PDF. If you're not familiar with the RR, then you're in for a treat. It's a largish download but worthwhile.

Check it out here!

Wednesday, February 11, 2009

Women's Wednesdays : Support Your Local Crafter!

It’s Wednesday, and I thought I’d share some more clothing finds for all the women readers. In particular, two items from a rather non-traditional source… Etsy. Etsy is a website dedicated to selling handcrafted items from independent makers. Because I am a maker in my own right, using Etsy to sell my jewelry, I like to support other makers on the site as much as possible. And, I’m happy to report that the number of bicycling and wool items on Etsy is growing day-to-day.


The first item is the Kingyo wool shirt from Vigilante Laboratories. Made from a mid-to-heavy-weight wool jersey, this shirt is unlike anything you will find from REI, mainly because it has personality. Granted, this shirt was probably not intended to be a technical item, but, given that it’s 100% wool, it performs incredibly well. A cowl neck and kimono-style sleeves give the shirt a lot of style, while also allowing a tremendous amount of breathability. Plus, this is a warm shirt. Layer it with sleeveless wool shirt underneath and some arm warmers and you’ll be right toasty in 40-50-degree weather. But, one of the best features about this shirt is the fact that it is individually made for you when you order. I happened to fall right in between the usual sizing and Lianna (that’s the maker) worked with me to customize the fit. It is hands-down one of my favorite pieces that I own. (I have the blue shirt featured, but she also makes a purple one.)


The next item is a pair of Snuggly Warm wool arm warmers from Overcast. These arm warmers are made in New Zealand from merino wool, and are designed with a thumb-loop so that they keep the base of your hand warm as well. I bought a simple black pair, so that they would coordinate well with everything, but they come in a wide range of colors. And, again, these are made individually, and Lucy (the maker) welcomes you to contact her with any questions. The arm warmers come in two weights, Superfine Spring and Snuggly Warm. I bought the Snuggly Warm and, while they feel lightweight, I’ve been pleasantly surprised with how warm they are. If you tend to get cold hands like I do, this is a worthy investment, as it helps keep your fingers from becoming icicles while also allowing you full movement of your fingers. The only things I could wish from these arm warmers is that they stretched up over my elbow (as they are, they stop right at the elbow). But, I am truly enjoying them and encourage you to take a look as well.

Etsy also features several other independent makers with wool items (as well as other epicurean fabrics like linen and seersucker). I recommend going to the Clothing category, selecting Men or Women as appropriate and then type “wool” into the search box. I promise you’ll be surprised by what you find. One small note about Etsy… because it is a community of independent makers, recognize in advance that everyone has different policies as far as shipping and returns, and make sure you read everything in advance, leave plenty of time when ordering, and contact the maker with any questions or concerns.

Going on another trip this weekend :)

After much debate (ok, it wasn't that hard of a sell), Laura and I are going to take advantage of the upcoming 3-day weekend. We're planning to take the train to Carpenteria and ride up to Lake Casitas, Ojai and Ventura. It may or may not rain, but we're prepared to deal with that. If anyone would like to join us on part of the route zip me an email.

It should be a fun trip. I did a portion of this trip by myself during the summer. See the pics here. Mileage is going to be pretty leisurely, leaving lots of time for pics and exploring.

Tuesday, February 10, 2009

Good luck Shawn and Jonathan.

I had the great luck of meeting two touring cyclists of the epicurean variety during lunch today. They were on the tail end of a two week trip from San Francisco to San Diego. Just as I was about to stuff myself with a reuben from Naples Grocer, I stopped when I spotted a porteur style rack from Pass and Stowe in their newish greyish color, a Jitensha handlebar bag (in a really lovely grey), a pair of Honjo fenders, some old school TA cyclotouriste cranks and Phil Wood hubs :)

I talked to them a bit and recommended they check out Pizza Port while they pass through San Clemente (they were beer aficionados). Anyway, good luck to you guys. When you guys get to San Deigo a good 2-3 day trip is to go to Escondido where Stone Brewing is at :) Enjoy!

Monday, February 9, 2009

More Photos

A slideshow from the recent trip. Enjoy:)

Sunday, February 8, 2009

O'Neill...again

Got back earlier this afternoon from O'Neill Regional Park. It was a fun time and it was nice to have some added company. Chris and Michael came along with us on a neat folding tandem. We've spoken so long about doing a tour together that it was nice to finally hit the road and do it.


When we left early Saturday, it was raining. It rained more or less the entire morning until we got to The Filling Station in Orange, where we made short work of another spectacular breakfast (it is a definite must-stop!). After breakfast part 2, we started doing a little climbing in the hills and had pretty good weather until the campground.


We set up our tents and unpacked. Laura and I then went to the showers. While we were in there, it started hailing! I could see the marble-sized pellets resting on the glass panels on the roof while I was in the shower. By the time we were out of the shower the hail had turned to rain. We couldn't quite bring ourselves to run out into the rain after such a relaxing shower so we killed time and hung out beneath the roof of the bathroom until it stopped and we walked back to camp.


We rode back to the ranger booth and strapped on two large bundles on the back of our bikes, much to the delight of the people on duty and some park guests.


Then we started making a rather elaborate dinner, cooking on Chris' paella pan. We cooked both on the Trangias and the campfire. He showed us how to control the heat by moving sticks around in the fire. After dinner we enjoyed the fire and the beautiful night. The moon was framed marvelously by the storm clouds.


Then, it started raining again. We packed up everything that needed to be packed and stood around the fire while the rain came down around us. We talked and kept warm by the fire, holding our hands over our glasses protecting them from the rain.

Finally, we decided to call it a night. A few minutes after Laura and I had jumped into our sleeping bags the rain came down again with a vengeance. It was pleasant, since it drowned out the sounds of passing cars.


The next morning (I guess technically this morning, though it seems like ages), we packed up. Most of our gear was soaked. I managed to keep most of my down gear relatively dry. We hightailed it out of camp and made it back to Long Beach at around 2pm. Whew.

Another fun trip. I have to say it was nice to do a trip in the rain, to get a sense of how prepared we were. I'm definitely investing in a few more dry bag sacks, particularly to protect down filled items. Other than that, most things performed admirably.

Some Quick Equipment Notes:
-IBEX leg warmers performed excellently again! Love em!
-North Face Apex Bionix gloves are NOT waterproof.
-Seal Skins socks worked well. I'm really liking this Keen Sandal, wool sock, Seal Skins sock combo for wet weather...now only if I can find a way to keep the toes warm.
-Jackson and Gibbens jacket I have worked fairly well in the heavy rain. My Pearl Izumi jacket would have been rendered useless in about 10 minutes. The J&G jacket, kept the water off, but slowly got wet where it was making constant contact with my other layers (just like a rainfly in a tent).
-REI Quarterdome 3 worked pretty well. We guyed it out for the first time and that kept things dry. Though, there was a mystery puddle beneath my sleeping pad that I still can't figure out where it came from.
-Earth, Wind and Rider jersey worked well...my current favorite for cool to wet weather.
-The EVT mirror I've been using has really grown on me. Yes, it's big, but you get use to it and it really becomes and invaluable tool.

Friday, February 6, 2009

Going Adventuring this weekend!

Going on another weekend tour. The original plan was to go to Chino Hills using a super secret dirt road provided by one of our faithful readers. However, the recent rains are going to turn that road more into a tar pit, so our band of 4 (hey, not just me and Laura this time!) are going to head over to O'Neill Regional Park again.

I haven't toured with more than one other person since Oregon. Group dynamics change a little bit, but we're all friends so I'm sure it will be ok.

Have a great weekend everyone! I'll be back with more snaps.

Minniehaha Small Saddlebag - Extended Review

(Laura has been the main user of the saddlebag over the last few months, so she has a really good user perspective of it. It has been on a few tours with us, so here are her impressions. A little late for Women's Wednesdays this week but early for next :)

I used to have a really ugly saddlebag on my bike. Totally functional and made out of some black rip-stop material, it held most of what I wanted to carry and kept it all dry. But when I got my new touring bike up and running, the ugly saddlebag just had to go away.

Luckily for me, Russ had recently gotten a hold of a small Minnehaha Canvas Saddle Bag and he was happy to let me give it a whirl. This simple black canvas bag with leather straps looks much better on my bike – and gives me an air of sophistication as I roll down the road. It attaches with one leather strap around the seat post and one leather strap through the rails of the saddle. A third leather strap provides the closure.


What I discovered with the Minnehaha bag is that I can carry so much more than I could with the aforementioned ugly bag. I feel like Mary Poppins, in that I can just keep stuffing things in. There’s even a small inside pocket and a clip for your keys. On average, I carry two spare tubes, a patch kit, two tire levers, a multi-tool, two rear blinky lights, a granola bar, plastic bag (to cover the Brooks in case of rain), cargo net, kleenex, ibuprofen, chapstick, and a padlock (a lighter-weight locking option when touring, just pair it with a cable).


There’s much talk of the benefits of “over-stuff-ability” – and this bag certainly expands to allow you to carry more and more. Simply stuff as needed and then use a different notch on the leather strap. In fact, I’ve found that the more I stuff in the bag, and thus have it cinched up more tightly, the more I feel assured that everything will stay put inside. (Just beware the pack-rat tendencies that this might encourage.)

The bag has two flaps on the sides of the opening that are meant to fold over the goodies inside and keep them from falling out. (They also feature grommets, which I assume would allow you to lash something to the bag if needed.) Most of the time, this design works with no problem. But, as I’ve taken it on more trips (including laying the bike sideways under a bus and standing it up on a hook on a train), I’ve started to become a bit wary of the strength of the flaps to actually do their job (I’ve even had to scramble after a few smaller items that have fallen out when orienting the bike in a not upright position). As much as I disliked the ugly bag I started with, its zipper closure always gave me the peace of mind that my stuff would stay put. My solution has been to stuff way to the back all of the smaller items that would be more liable to slip out, and then put something larger (like my cargo net) at the opening as a sort of block. And, as long as I don’t get too lazy with my stuffing, this works out just fine.

In all, the Minnehaha bag has been a great addition to my touring bike. It’s a lovely and very well-made bag. And the strap closure provides an excellent spot to attach a rear blinky light. I would simply recommend putting a lot of loose stuff in a separate bag inside or stuffing small items to the back to avoid anything rattling out if you plan on orienting your bike in anything but a normal riding position.

A quick note: In looking at the Minnehaha site today, it appears as though they have modified the bag design slightly. It now features two loops on the top of the bag, allowing you to strap it to the tabs on your Brooks saddle, instead of attaching through the rail. This would effectively tilt the bag so that the opening is facing more upward, and would hopefully help items stay inside better. A definite improvement.

Wednesday, February 4, 2009

Riv posts new bags!

Just casually perusing the Rivendell site today (ok, I compulsively check it), and they have links to the new bags!

The line is called Sackville and they look really promising! Hopefully, Riv can keep enough of them in stock. Here are some pictures of the LARGE bag from the Riv site.


This LARGE Saddesack (about 1,425 cubic inches without overstuffing, and it is quite overstuffable) is the most capacious, easiest-to-load/unload saddlebag we've ever offered. It's big enough to require a rack or some kind of under-support, but it holds a massive heap of anything. Ideal for camping, commuting, shopping. Combined with a bag or basket up front, it's great for ultralight week-long tours.

On the country side, you can force in a tent, sleeping bag, clothing, toiletries, and small stove and kitchen.
On the ciity side, a laptop, books and files up the wazoo, and shoes and clothing loosely packed.
On the shopping side, stacks of binders, and armfuls of cauliflower, or a Thanksgiving dinner for four, turkey included. (One of the photos shows what Jay here recently picked up on a shopping run for lunch and snacks here.)
Yet it's light, and never in the way even empty.


The Sackville isn't just another fancy dupe of a Carradice either! They've added some pretty neat additions. Most notably are zippered pockets that face toward the rider that you can access while riding. Pretty cool! A great place to leave some Sweetarts or phone.


They also feature a small zippered pouch that can be separated from the main bag. So you can store your valuables in it while on tour and take it with you.

Alongside the LARGE version, they're coming out with a medium-sized bag that can be used without a rack (if you have enough seatpost showing). The medium-sized bag lacks the front-facing zipper pockets (bummer), but has the removable zippered pouch.

Which would I get? Hard to say, but I'd lean towards the large one to quench any existential doubt like "geez, if I only got the other one I could carry more stuff for this trip, etc.," They're taking orders now and the bags themselves should be in mid-March.

Tuesday, February 3, 2009

Panniers with Style!

Panniers suffer the usual problem with other bike products. Too techy. Too drab. No neat patterns. Blech. Well, Queen B Creations is looking to change that. Her new line of panniers are ready for sale. Check out all the neat patterns here.


Monday, February 2, 2009

New Riv Bags

Posted on their website today:


We're introducing a new line of bags: Sackville (after the famous town in Canada). They should be called Blackville, because they're black. We'll have pixup on the site in a week or less, and if you've room for another bag in your life, they're worth a look or even a long, creepy stare. They're different from anything we've done before, and I think they'll be tough to equal. They're made by a small company comprised of former Coach and Dooney&Bourke workers who lost their jobs when those companies went to China.


Also something new on their website are the rotating images on their webpage. Some great new BW photos of them riding around in the hills.

The Long Haul

I know I write about short trips most of the time, but I do have future intentions of doing longer round-the-world type trips in the future (hopefully sooner than later). It doesn't get much longer than Rob Lilwall and his wheeled adventures. I hope to one day join in the ranks of these intrepid tourists.


www.cyclinghomefromsiberia.com


Some days in the life of a Siberian cyclist... a dazzling rush through some random encounters from Rob Lilwall on Vimeo.


A funny video on recording your bicycle trip.


How to make a cycling expedition film if you are both the cameraman and the presenter from Rob Lilwall on Vimeo.